Building A Detection Lab
Introduction
Why
Create a platform to safely run malware so I can detect, analyze, and build alerts based on noted signatures. It also gives me a place to run example attack scenarios and see it play out in the logs.
How
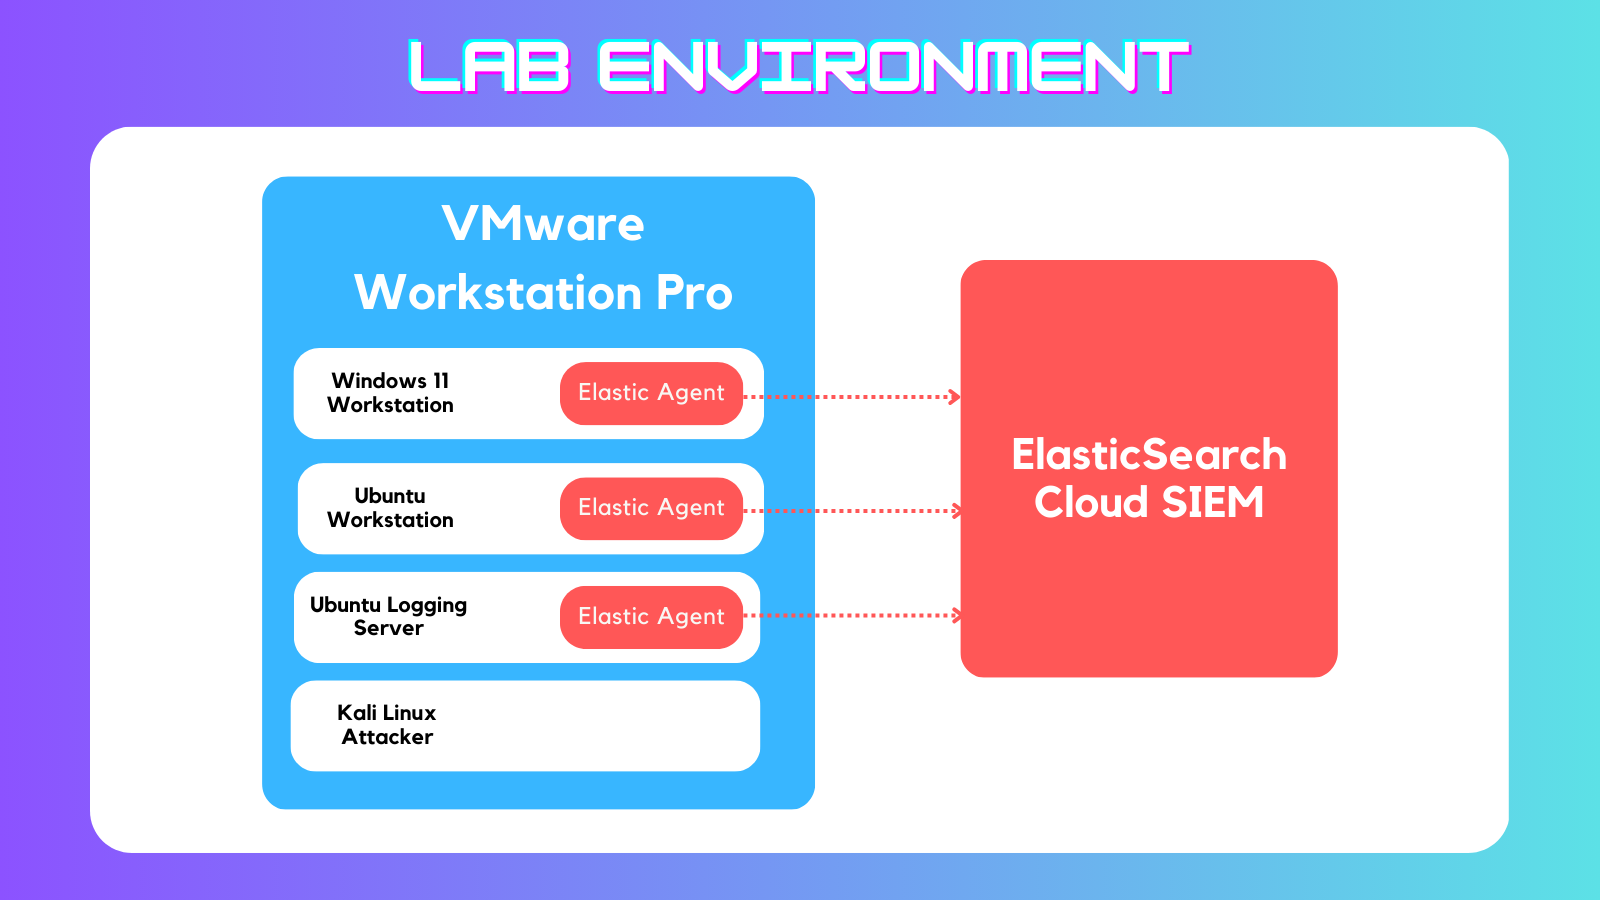
Locally run VMs w/ cloud SIEM VMs In Use:
- Windows 11 Workstation w Sysmon
- Ubuntu Workstation
- Ubuntu Logger running Zeek
- Kali Attacker
I used the ElasticSearch Cloud Security SIEM free trial to collect and analyze logs from each VM. Attacks can be run manually via Kali machine or via Atomic Red Team.
Where
Installed on Windows 11 x64 Host machine running VMware Workstation Pro. Through my testing I have found this set up is not compatible with ARM systems. Mainly due to Elastic’s Windows agent not having a Windows ARM compatible installer. I suppose if you wanted to skip the Sysmon logging you could do ARM but I don’t recommend it.
Installing the Virtual Machines
Broadcom recently made VMware Workstation Pro free for personal use so I am making full use of that. They just require you to make an account on their site (tragic).
On to installing the VMs. I acquired the ISOs from each vendor’s download page:
- https://www.microsoft.com/en-us/evalcenter/download-windows-11-enterprise
- https://ubuntu.com/download/desktop
- https://www.kali.org/get-kali/#kali-installer-images
Creating the VMs in VMware is fairly straightforward. I used something like 4-8GB RAM, 2-4 Cores, ~20GB Storage (50 for Windows) for each machine. you may be able to get away with using less.
For each machine its important I create a second network interface and set it to “Host Only”. This will create a private network for the VMs so they do not share the Host IP or run exploits on my home network.
I also found it made more sense to use an Ubuntu Desktop instance as my “Server” for mainly for the convenience of copy/paste in the open-vm-tools.
Configuring the Virtual Machines
Now that the machines installed it was time to get them configured. A few things needed to be done such as disabling Windows Defender, installing Sysmon, installing Invoke-Atomic, installing Zeek on the Ubuntu logger etc.
Setting Up Windows Workstation VM
Disabling Windows Defender
Virus & threat protection > manage settings >
- Tamper Protection: Off
- Cloud Upload: Off
Automatic Submission: Off
- Admin PowerShell >
gpedit.msc> Computer Configuration > Administrative Templates > Windows Components > Microsoft Defender Antivirus >- Turn off Microsoft Defender Antivirus > Enabled
- Real-time Protection >
- Turn off Real-time Protection > Enabled
- Turn on behavior monitoring > Enabled
Install Sysmon
Sysmon Download Link: https://download.sysinternals.com/files/Sysmon.zip
Swiftonsecurity Sysmon Configuration Download Link: https://github.com/SwiftOnSecurity/sysmon-config/archive/refs/heads/master.zip
Extract the folders in the Download folder and move sysmonconfig-export.xml to the sysmon folder. Open Admin PowerShell and run the following command from the Sysmon folder:
1
./sysmon.exe -accepteula -i sysmonconfig-export.xml
Improve PowerShell Visibility
Local Group Policy Editor > Computer Configuration > Administrative Templates > Windows Components > Windows PowerShell
- Turn on Module Logging
- Enabled
- Module Names > Show >
*
- Turn on PowerShell Script Block Logging
- Enabled
- Log script block invocation start/stop events: Checked
- Turn on Script Execution
- Enabled
- Execution Policy: Allow all scripts
- Turn on PowerShell Transcription
- Enabled
Install Invoke Atomic Red Team
Open an Admin PowerShell window and run the following commands:
1
2
3
Install-Module -Name invoke-atomicredteam,powershell-yaml -Scope CurrentUser
IEX (IWR 'https://raw.githubusercontent.com/redcanaryco/invoke-atomicredteam/master/install-atomicredteam.ps1' -UseBasicParsing);
Install-AtomicRedTeam -getAtomics
Set Up Ubuntu Server VM
Pre-Install Housekeeping
First I ran a a one-liner to get the VM updated and install open-vm-tools which allow the VM copy/paste as well as the ability to resize the window while updating display resolution. I like open-vm-tools because it adds necessary quality of life upgrades for me while running the lab.
1
2
3
sudo apt update && \
sudo apt upgrade -y && \
sudo apt install -y open-vm-tools open-vm-tools-desktop curl terminator
Next I needed to create a password for the root user so I could use it.
1
sudo passwd root
Then I switched to root user
1
su root
Installing Zeek
I then grabbed the install command from the Zeek Documentation Page and ran it as root.
1
2
3
4
echo 'deb http://download.opensuse.org/repositories/security:/zeek/xUbuntu_22.04/ /' | sudo tee /etc/apt/sources.list.d/security:zeek.list
curl -fsSL https://download.opensuse.org/repositories/security:zeek/xUbuntu_22.04/Release.key | gpg --dearmor | sudo tee /etc/apt/trusted.gpg.d/security_zeek.gpg > /dev/null
sudo apt update
sudo apt install zeek-6.0 -y
When prompted I chose the No Configuration option.
Configuring Zeek
The default installation put Zeek in the /opt/zeek folder. There were a few config files that needed to be updated.
networks.cfg
networks.cfg - Tells Zeek which networks to monitor. I set this to just include the VMware Private network created by the “Host Only” network setting. To find the range of my internal network I ran the following command.
1
ip addr | grep "inet "
Output:
```plain text inet 127.0.0.1/8 scope host lo inet 172.16.44.132/24 brd 172.16.44.255 scope global dynamic noprefixroute ens160 inet 172.16.1.129/24 brd 172.16.1.255 scope global dynamic noprefixroute ens256
1
2
3
4
5
6
7

The third line is my internal IP, therefore the network is `172.16.1.0/24`.

I added this network to `network.cfg` with this command:

```bash
echo "172.16.1.0/24           Private IP Space" >> /opt/zeek/etc/networks.cfg
node.cfg
From the previous IP address output I also found the interface is named ens256. This will go into the node.cfg file at interface=
1
nano /opt/zeek/etc/node.cfg
__load__.zeek and local.zeek
Elastic’s agent needs Zeek to push logs in JSON format. To do this I made this change to the __load__.zeek file located at /opt/zeek/share/zeek/policy/tuning/defaults/
1
echo "@load ../json-logs.zeek" >> /opt/zeek/share/zeek/policy/tuning/defaults/__load__.zeek
1
echo "@load policy/tuning/json-logs.zeek" >> /opt/zeek/share/zeek/site/local.zeek
Starting Zeek
1
2
3
4
su root
cd /opt/zeek/bin
./zeekctl
[ZeekControl] > deploy
Installing Atomic Red Team
Then I needed to install PowerShell so I could install Invoke-AtomicRedTeam
1
2
3
4
5
6
7
8
sudo apt-get install -y wget apt-transport-https software-properties-common
source /etc/os-release
wget -q https://packages.microsoft.com/config/ubuntu/$VERSION_ID/packages-microsoft-prod.deb
sudo dpkg -i packages-microsoft-prod.deb
rm packages-microsoft-prod.deb
sudo apt-get update
sudo apt-get install -y powershell
sudo pwsh
Now I can install Atomic Red Team using the same commands as before for Windows:
1
2
3
Install-Module -Name invoke-atomicredteam,powershell-yaml -Scope CurrentUser
IEX (IWR 'https://raw.githubusercontent.com/redcanaryco/invoke-atomicredteam/master/install-atomicredteam.ps1' -UseBasicParsing);
Install-AtomicRedTeam -getAtomics
Set Up Ubuntu Workstation VM
To start, the same initial command for the Ubuntu Server to update and install some tools:
1
2
3
sudo apt update && \
sudo apt upgrade -y && \
sudo apt install -y open-vm-tools open-vm-tools-desktop curl terminator
Then I needed to install PowerShell so I could install Invoke-AtomicRedTeam
1
2
3
4
5
6
7
8
sudo apt-get install -y wget apt-transport-https software-properties-common
source /etc/os-release
wget -q https://packages.microsoft.com/config/ubuntu/$VERSION_ID/packages-microsoft-prod.deb
sudo dpkg -i packages-microsoft-prod.deb
rm packages-microsoft-prod.deb
sudo apt-get update
sudo apt-get install -y powershell
sudo pwsh
Now I can install Atomic Red Team using the same commands as before for Windows:
1
2
3
Install-Module -Name invoke-atomicredteam,powershell-yaml -Scope CurrentUser
IEX (IWR 'https://raw.githubusercontent.com/redcanaryco/invoke-atomicredteam/master/install-atomicredteam.ps1' -UseBasicParsing);
Install-AtomicRedTeam -getAtomics
Create Pre-Elastic Snapshots
Elastic Cloud allows you to have a 2 week free trial of their services. In case my lab lasted longer than that I wanted a way to fully remove the Elastic Agents so I can restart with a new cloud instance. The easiest way I have found is to configure the VMs before adding the agents, save a snapshot, then install the agents. This way I can roll back to a previous version before Elastic ever touched the machine.
Alternatively you can run these commands to remove the elastic agent from a host:
Windows:
1
C:\"Program Files"\Elastic\Agent\elastic-agent.exe uninstall
Linux:
1
sudo /opt/Elastic/Agent/elastic-agent uninstall
MacOS:
1
sudo /Library/Elastic/Agent/elastic-agent uninstall
Install Elastic Agents
First I needed to sign up for an ElasticSearch Cloud free trial. I went over to https://cloud.elastic.co/registration and signed up with a new account. I selected the location for my cloud instance, selected the option for Elastic Security and let the wizard build the project.
Once this was done I needed to add agent integrations for my VMs. I went to the Integrations page and searched for the integrations below:
Elastic Defend
Installing the Agent will give you an install command such as the one below:
1
2
3

$ProgressPreference = 'SilentlyContinue' Invoke-WebRequest -Uri https://artifacts.elastic.co/downloads/beats/elastic-agent/elastic-agent-9.0.1-windows-x86_64.zip -OutFile elastic-agent-9.0.1-windows-x86_64.zip Expand-Archive .\elastic-agent-9.0.1-windows-x86_64.zip -DestinationPath . cd elastic-agent-9.0.1-windows-x86_64 .\elastic-agent.exe install --url=https://f1f854e744b24084888cdb940e60c8bf.fleet.us-east-1.aws.elastic.cloud:443 --enrollment-token=QVNPMDJwWUJ2c3hxRXhDcFM1VDQ6MlA0b1Y0QkNiVDFBWmUxVW1RWGs0UQ==
Wait for the Agent Enrollment confirmation on the Elastic console to prove the agent was installed correctly on the Windows Workstation.
Once the agent is installed I needed to add the integration using the Elastic Defend integration workflow.
- Installed on all workstation machines. The PowerShell command can be found at Integrations > Elastic Defend > Add Integration.
- Disabled the default preventions
- Integration policies > endpoint > Edit Integration
- Malware protection enabled: True
- Protection level: Detect
- Ransomware protection enabled: True
- Protection level: Detect
- DO THIS FOR ALL TYPES
- Save and deploy changes
- Malware protection enabled: True
- Integration policies > endpoint > Edit Integration
Zeek Agent
- Installed on the Ubuntu Server VM.
- This is a quick copy/paste into terminal and wait for the enrollment confirmation
Windows Agent
- Needed to read the Sysmon and PowerShell data.
- Add to existing windows host via policy.