Chapter 3: Install Tailscale
Step 0 - Introduction
Tailscale is a zero-config VPN that connects your devices into a private network, regardless of their location. Unlike traditional VPNs like Wireguard, it doesn’t require a dedicated server.
In this setup, we’ll run Tailscale in a container that advertises subnet routes, making all devices on your home network accessible through Tailscale without installing the client on each one.
Step 1 - Download Ubuntu Container Image
First, download the container templates for Proxmox:
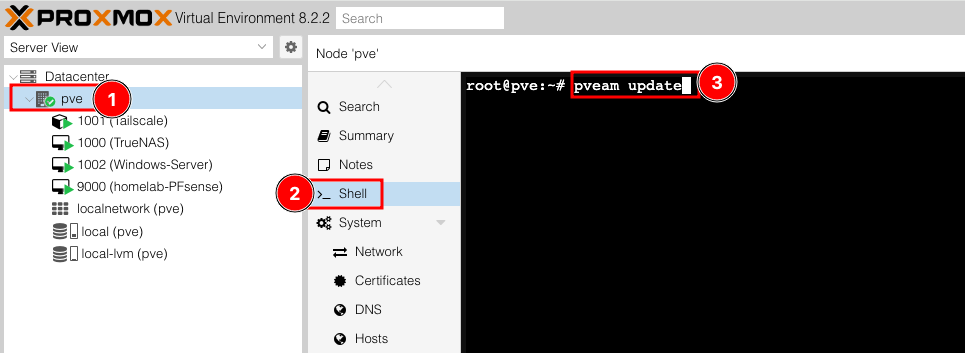
- Open the shell on your Proxmox node (click
[your-node-name]>Shell) - Run
pveam update - Wait for ‘update successful’ message
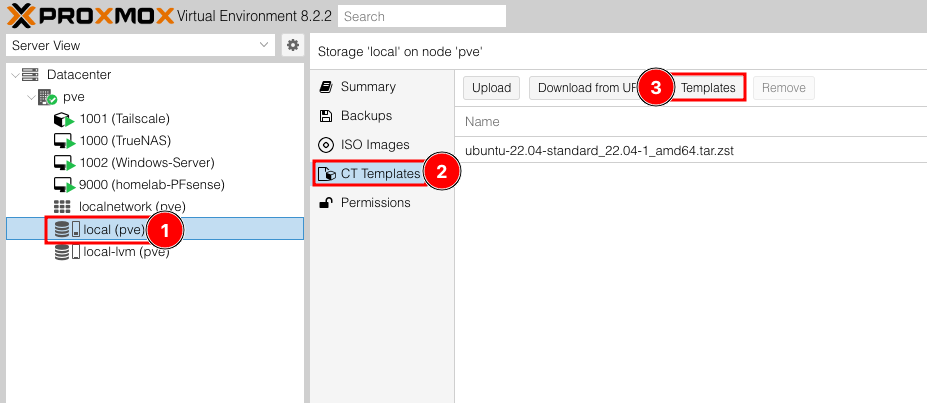
Now lets go over to local (pve) > CT Templates > Templates to select from the list of built-in Proxmox templates.
It’s worth taking some time to look through the list of templates to see just how many thing we can run from basically a point-and-click setup. After you have taken some time to browse the list, look for a package named ubuntu-22.04-standard, select it and click Download. You can close the download window after the template has finished downloading. We are now ready to move on to the next step.
Note: We will need to use Ubuntu 22.04 because the most recent version, 24.04 is not currently compatible with our Proxmox setup.
Step 2 - Install LXC Container for Tailscale
Setup The Container
Now that we have our template installed let’s click the Create CT button up in the top right corner of the Proxmox web console.
- General
- Hostname:
Tailscale - Password: Choose something secure
- Hostname:
- Template
- Template:
ubuntu-24.04-standard_22.04-2_amd64.tar.zst
- Template:
- CPU
- Cores: 2
- Memory
- Memory (MiB): 2048
- Network
- IPv4: DHCP
- Confirm
- Finish
Set Static IP Address
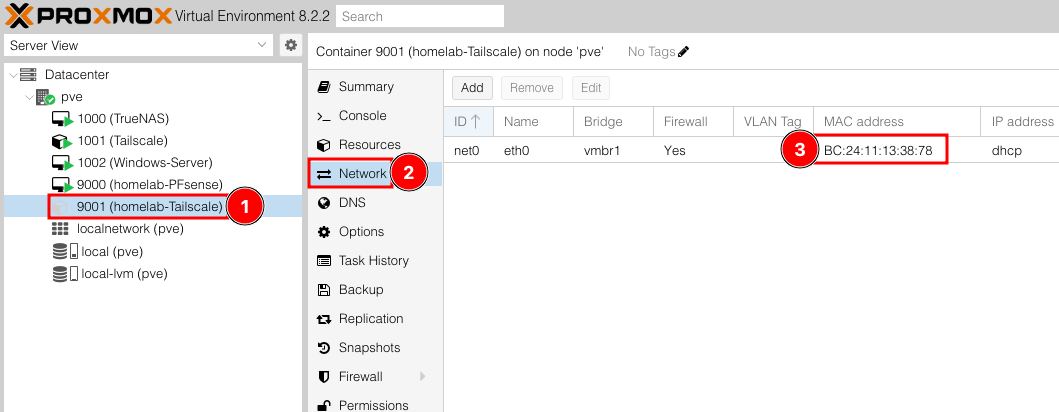
Before we start the container we want to go to Tailscale > Network and take note of the MAC address being used by the Tailscale container. For instance, mine is BC:24:11:13:38:78. You can double click into the address to make it copy-pastable.
Now that we have our MAC address let’s head over to our router Admin Console. This will be a little bit different for each user as we likely do not use the same router at home. Search for a page in your router’s settings such as DHCP Server or LAN Setup. We want to find the place that will let us set static IP addresses.
Once you find this page, you will want to set the IP address you wish this machine to always have and the MAC address we got earlier. When your router associates in the DHCP static mapping settings it will ensure your Tailscale server always uses the same IP address you set for it.
Now we need to go to Tailscale > Console and then log in with the username root and the password we set during the container setup in the last step. Once logged in we can verify the IP address the machine grabbed with DHCP with the following terminal command:
1
ip a | grep "inet "
ip a- Displays IP address information for the machine.|- Forwards the output of the previous command to become the input of the next command.grep "inet "- Searches through input and filters output to just lines containing"inet "
My Tailscale container shows it has the static IP address we set from the router. This is not strictly necessary for Tailscale to operate but it is a good practice to get in the habit of doing for various servers we may make. Later on, we will need to set static IPs for some of our machines and will need to be the same in order to connect to them consistently and reliably. Now we need to install the actual Tailscale software onto the container.
Step 3 - Install Tailscale Client
The easiest way to install Tailscale is using the open-source script found at https://tteck.github.io/Proxmox/#tailscale. For the sake of convenience I have also included the install command below. The instructions explain that we need to run this command from the Proxmox node, NOT from the Tailscale container.
Note: Run the following command from the Proxmox node Shell
Let’s go to pve > Shell to open the console. Log in if you have to and copy/paste the following command:
1
bash -c "$(wget -qLO - https://github.com/tteck/Proxmox/raw/main/misc/add-tailscale-lxc.sh)"
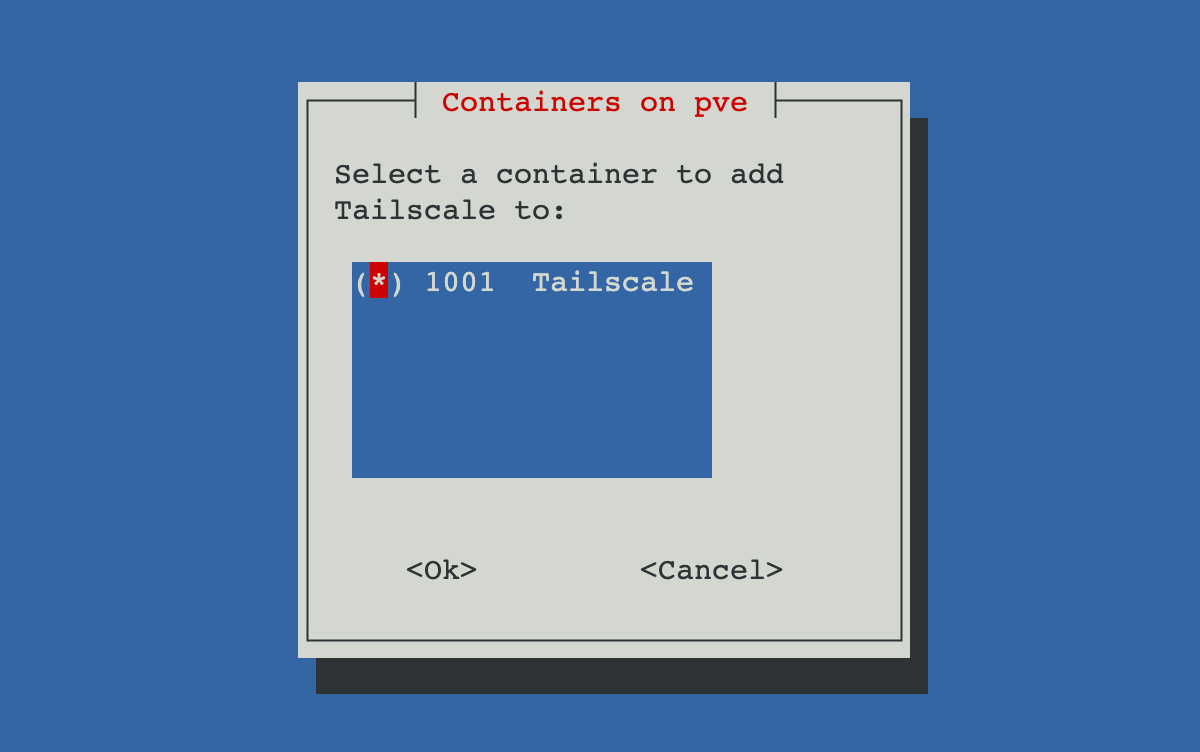
Follow the install wizard provided by the script. Use the arrow keys to navigate through the menu and space bar to check the checkboxes. Find the Tailscale container we created and select the option by hitting space until a (*) appears in the parentheses. Then move to <Ok> and press Enter.
Tailscale will begin to install itself onto our container. Once the installer is done we get this screen telling us to reboot our container then run tailscale up to start tailscale.
Reboot the container by right clicking its name on the left sidebar and choosing Reboot. Once it is back up we can run tailscale --version to confirm tailscale installed correctly on this machine.
Step 4 - Run Tailscale and Advertise Routes
In order to run the Tailscale Subnet node we will first need to run a few commands to allow IP forwarding within the container. The last command runs tailscale and advertises the network created by our home router to the Tailscale VPN.
1
2
3
4
echo 'net.ipv4.ip_forward = 1' | sudo tee -a /etc/sysctl.d/99-tailscale.conf
echo 'net.ipv6.conf.all.forwarding = 1' | sudo tee -a /etc/sysctl.d/99-tailscale.conf
sudo sysctl -p /etc/sysctl.d/99-tailscale.conf
tailscale up --advertise-routes=10.31.0.0/24
For the
tailscale upcommand use the IP Address for the network you want Tailscale to advertise to the VPN network. For instance if your home router IP is 192.168.1.1 you will likely want to use 192.168.1.0
Then tailscale gives us a URL to use to login.
Once we copy/paste this URL into our browser we get a tailscale login page. I recommend creating a new Tailscale account, even if you already have one so you can keep your home lab separate from there rest of the network. After creating this account and logging in we can go back to our Tailscale container and see it successfully logged in. Now we can run tailscale status to confirm it is running.
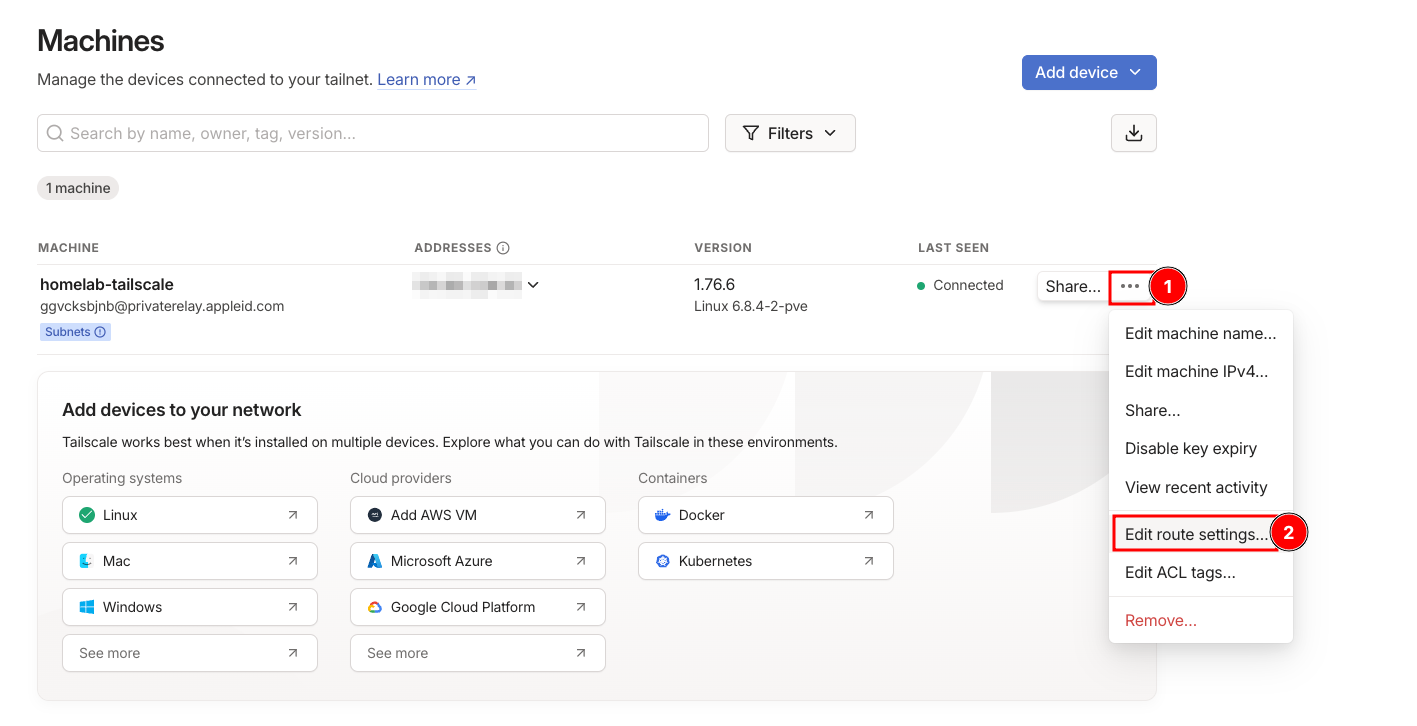
Now we need to go to the admin console for Tailscale and enable the routes on that side. Let’s visit https://login.tailscale.com/admin/machines and we can see our Tailscale machine sitting there. Click on the triple dot icon next to our tailscale machine and select Edit route settings.
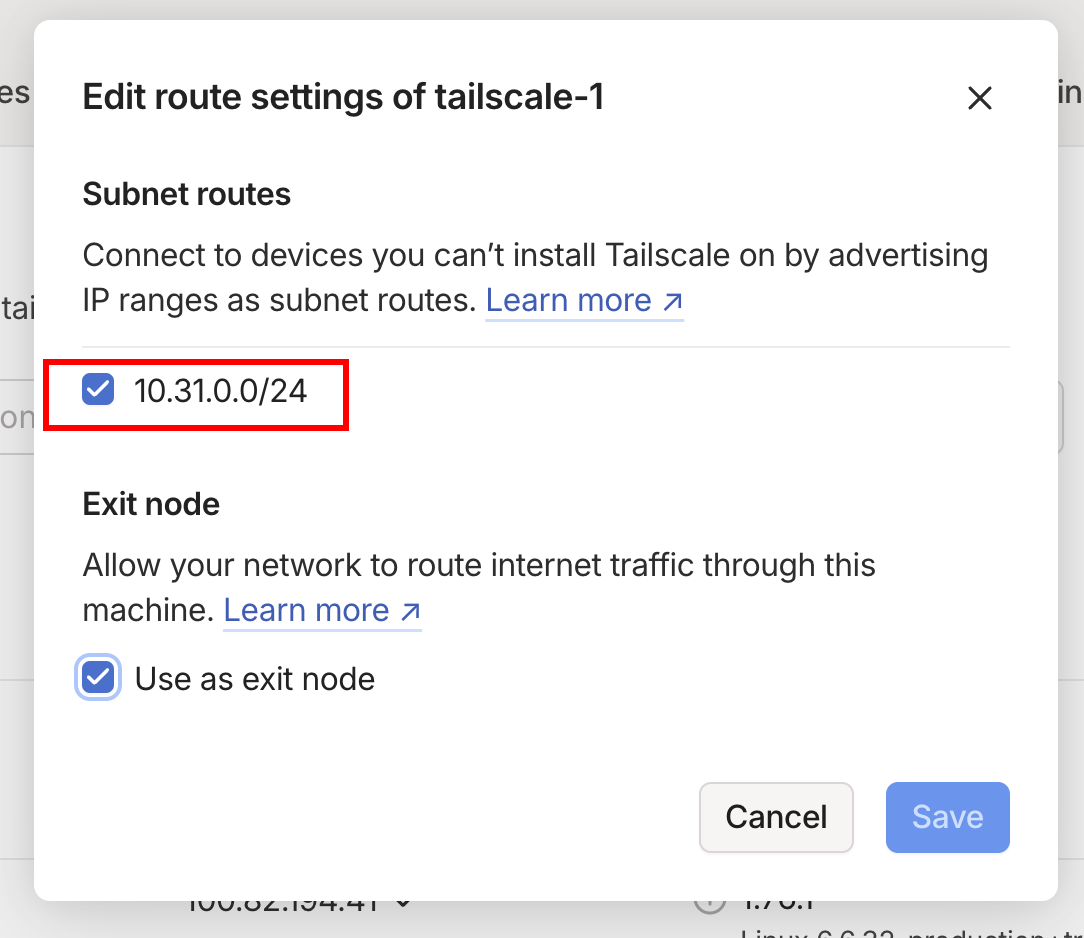
Check the checkbox for the IP range 10.31.0.1/24 then click Save. Now our Tailscale subnet server is complete.
OPTIONAL STEP: You may have noticed when I ran the
tailscale up --advertise-routes=10.31.0.0/24command I also included--advertise-exit-node. Adding this allows you to route your device’s traffic through the Tailscale exit node so it appears you are connecting to a website from the location of the Tailscale exit node rather than your actual location. If you choose to follow this step as well make sure the “Use as exit node” checkbox is selected as well.
Step 5 - Confirm Tailscale VPN connection
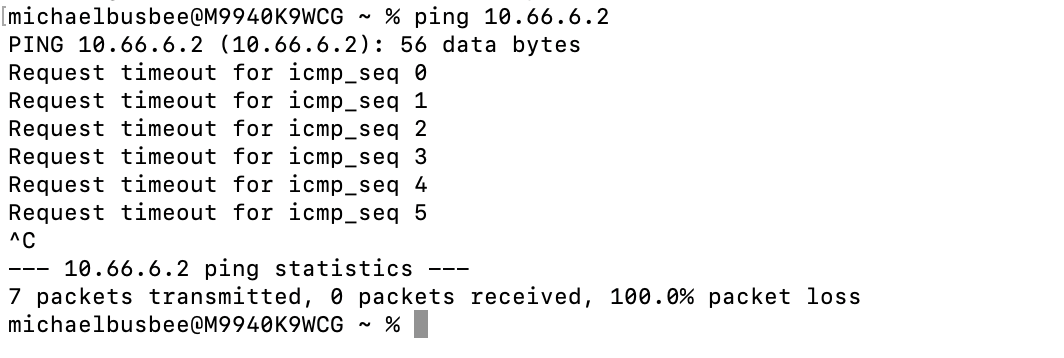
To test whether the VPN connection is working we can first try to ping an IP on our network range and see that it does not work.
Next, we need to install the Tailscale client on our personal machine. Navigate to https://tailscale.com/download and select the version that works for your system. After install, go through the login process and use the same credentials as we did for the previous tailscale setup. Once the app is up and running, go back to terminal and ping that address again.
Here we can see the VPN connection is now allowing us through. We can now confidently move on to the next part of the guide.
